本文最后更新于 3 年前,文中所描述的信息可能已发生改变。
前言
本篇记录使用selenium+yes,captcha配合copilot过人机验证签到续期时的记录
Yes,captcha
介绍
因为遇到了某个免费服务需要经常续期,刚开始在登陆的时候就遇到了谷歌的recaptcha验证,网上找到Yes,captcha,可以轻易解决谷歌验证,除此之外还有很多比如2captcha等提供类似的服务
Yes captcha注册后找客服会拿到1500点的试用点数,一次过谷歌v2验证是15点,大概可以使用100次左右。
使用
yescaptcha提供了一个api,只需要需要post提交网站的sitekey和URL。sitekey很容易获取,打开网站,F12进入开发者模式,直接command+F搜索sitekey就可以搜到了,TYPE在网站文档中可以找到,在这次我们需要过谷歌的v2,所以TYPE就是NoCaptchaTaskProxyless
data = {
        'clientKey': TOKEN,
        'task': {
            'type': TYPE,
            'websiteURL': WEB_URL,
            'websiteKey': SITE_KEY
        }
}POST到api+createTask创建任务后会返回taskId,之后就需要循环检查任务是否完成,代码只写了注释之后copilot居然直接就写出来了
# POST request and get "taskId" from response
def PostRequest():
    data = {
        'clientKey': TOKEN,
        'task': {
            'type': TYPE,
            'websiteURL': WEB_URL,
            'websiteKey': SITE_KEY
        }
    }
    response = requests.post(API+'createTask', json=data)
    return response.json()['taskId']

# Use "taskId" and token check status, if status is "ready" get "gRecaptchaResponse" in 'solution'. if status is "processing" wait 5 seconds and check again
def GetRequest(taskId):
    data = {
        'clientKey': TOKEN,
        'taskId': taskId
    }
    response = requests.post(API+'getTaskResult', json=data)
    if response.json()['status'] == 'ready':
        return response.json()['solution']['gRecaptchaResponse']
    else:
        time.sleep(5)
return GetRequest(taskId)检查了一下好像没什么问题,在任务完成后可以在response中获取到gRecaptchaResponse,这个值就是我们需要上交到服务器验证的,yes captcha的文档中分情况写了应对各种情况的方法,比如我们的网站找不到回调函数,直接使用js把返回的token插入就行
driver.execute_script("document.getElementById('g-recaptcha-response').innerHTML = '"+GetRequest(PostRequest())+"'")之后点击提交顺利通过登录的谷歌验证。
数字加减验证
第二部在签到/续期中,网站有一个计算加减法的人机验证,这里需要输入答案也就没办法使用上面的方法了。这里我的想法是使用OCR识别图片数字,然后判断是加法还是乘法,计算填入结果。

由于这种验证的数字图片都是一次性的,即第一次加载后,再访问验证码图片通常会直接404或出现不同的数字,不过selenium中提供了一个截图函数,可以根据元素位置截图再进行OCR识别。
for i in range(1,3):

        imgelement = driver.find_element(By.XPATH, '/html/body/main/div/div/div[2]/div/div/div/div/div/form/div[2]/div[1]/img[' + str(i)+']')  # 定位验证码
        data = imgelement.screenshot_as_png
        with open('image.png', 'wb') as f:
            f.write(data)

        text = GetText('image.png')
由于网站是 几加几,所以我让程序两次分别截取两个数字的图片,不过现在发现貌似可以直接带着计算符号一起截图使用OCR识别
OCR
pytesseract
我这里使用的是谷歌pytesseract模块,在使用前需要安装tesseract-ocr,Mac: brew install tesseract,Debian: apt-get install tesseract-ocr
随之而来的问题是他居然不能识别单独的数字,只有单独数字的图片只会返回空,这里就需要设定psm参数,如下:
Page segmentation modes:
  0    Orientation and script detection (OSD) only.
  1    Automatic page segmentation with OSD.
  2    Automatic page segmentation, but no OSD, or OCR.
  3    Fully automatic page segmentation, but no OSD. (Default)
  4    Assume a single column of text of variable sizes.
  5    Assume a single uniform block of vertically aligned text.
  6    Assume a single uniform block of text.
  7    Treat the image as a single text line.
  8    Treat the image as a single word.
  9    Treat the image as a single word in a circle.
 10    Treat the image as a single character.
 11    Sparse text. Find as much text as possible in no particular order.
 12    Sparse text with OSD.
 13    Raw line. Treat the image as a single text line,
       bypassing hacks that are Tesseract-specific.
设定6,7,10就可以识别单独的数字图片。
另外发现这个模块经常把7识别成?,可以加上tessedit_char_whitelist=0123456789就可以只识别数字了
# use pytesseract to get the text from the image
def GetText(image):
    from pytesseract import image_to_string
return image_to_string(image, config='--psm 10 -c tessedit_char_whitelist=0123456789')tesseract的更多参数可以看这个:https://www.cnblogs.com/pyweb/p/11340357.html
由于这个网站的数字图片过于扭曲,发现谷歌很多都识别不出来,想了想使用在线OCR有点浪费,索性又找了一个百度的开源OCR模块,很多谷歌识别不出来的数字百度就可以,可以两个配合着一起用
PaddleOCR
Github仓库,PaddleOCR使用起来也很简单,唯一要注意的是参数设置det=False可以只保留结果
def baiduOcr(image):
    ocr = PaddleOCR(use_angle_cls=True, lang="ch")
    result = ocr.ocr(image, cls=True,det=False)
    return int(result[0][0])
写到这里基本已经完成,本想部署在GitHub action后就大功告成了,结果发现在GitHub action中一直卡在第一步,报错element not found,本以为是因为网页没有加载完成,索性写了个time.sleep(30), 然鹅依旧是这个错误,这下有点摸不到头脑了,怎么会这样呢,干脆又写了一个函数在错误的时候返回整个页面以供研究
def error(driver):
    return driver.page_source
结果。。。
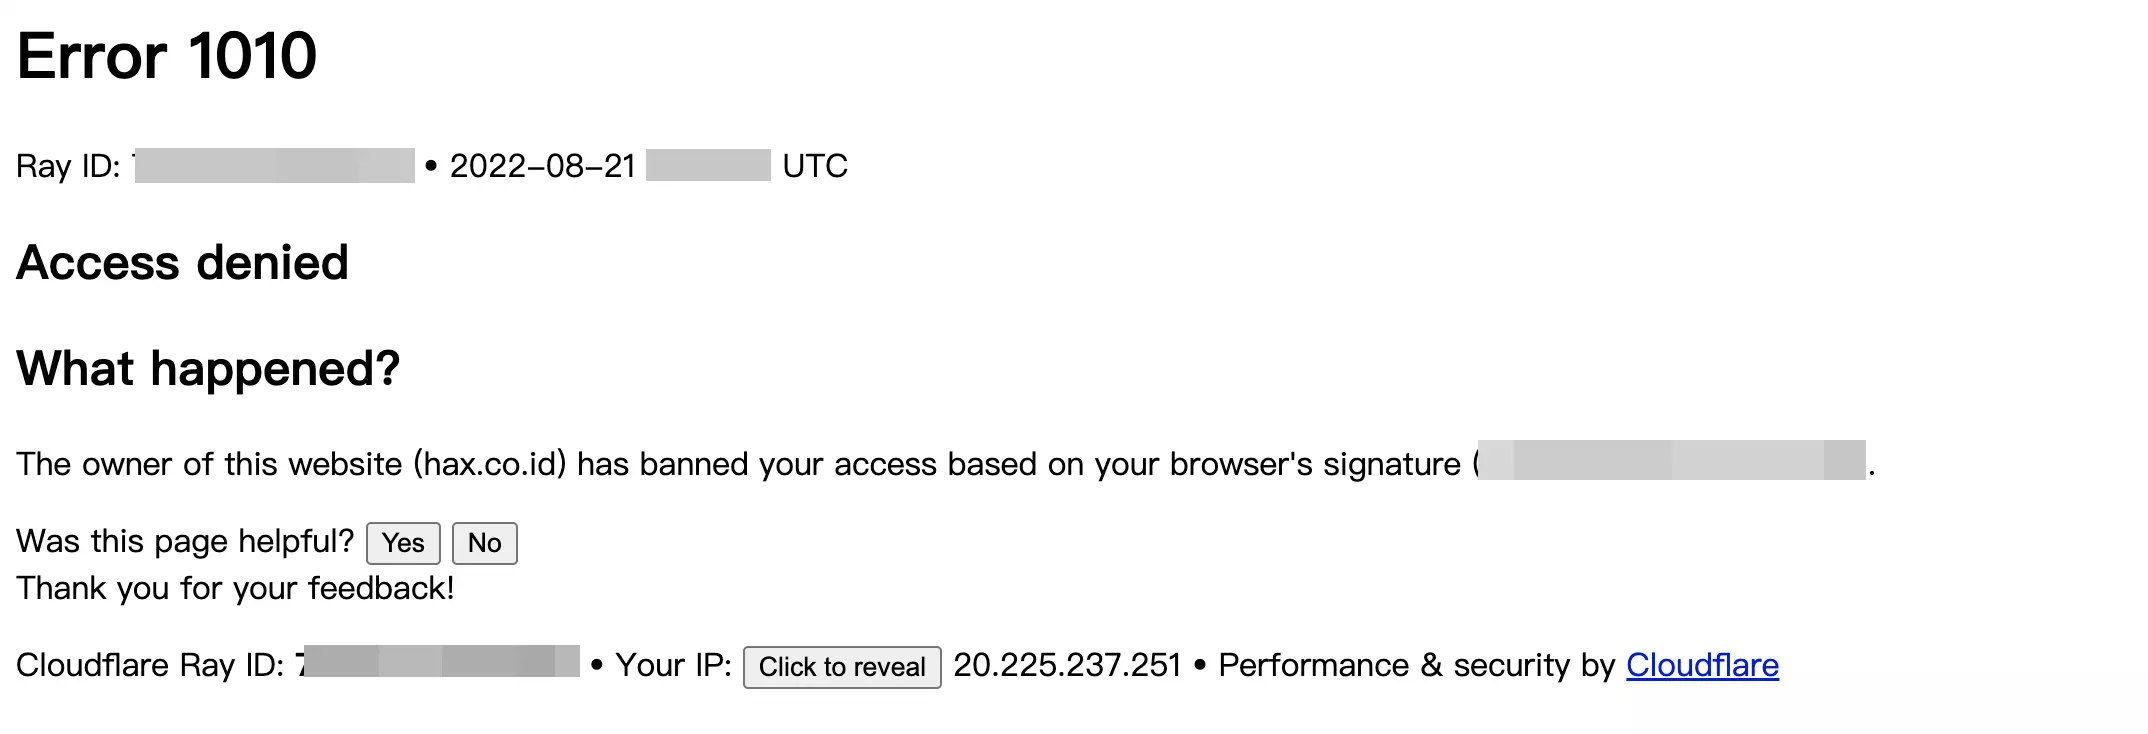
这下
过Cloudflare
这里也很奇怪,我在本地用selenium从来没遇到过被ban的情况,一到GitHub action就寄了,猜测网站腐竹可能对GitHub action的ip段加了更多的验证,之后在网络上找到了undetected-chromedriver,可以隐藏selenium某些特征,确保网站检测不到是selenium在访问
不过问题再次出现,使用这个模块本地测试没问题,在服务器上就selenium.common.exceptions.WebDriverException: Message: unknown error: cannot connect to chrome at 127.0.0.1:39865 from chrome not reachable
翻了半天的issue,发现问题好像出现在--headless上,我在本地不管加不加headless参数,浏览器都会正常弹出窗口并继续,猜测应该是因为这个原因导致服务器上无法使用
然后在issue里发现一位老哥使用XVFB成功解决这个问题
XVFB
wiki,这个插件可以模拟出一个显示屏,但不会有图像输出,刚好可以解决undetected-chromedriver无法使用headless的问题,python中也有对应的模块:
from xvfbwrapper import Xvfb
vdisplay = Xvfb(width=800, height=1280)
vdisplay.start()
...
...
vdisplay.stop()
完美!
Github Action部署chromdriver
这里有相应可以使用的仓库,之前没发现硬是写了一堆安装chromedriver的shell脚本
- uses: nanasess/setup-chromedriver@v1
- run: |
        export DISPLAY=:99
        chromedriver --url-base=/wd/hub &
        sudo Xvfb -ac :99 -screen 0 1280x1024x24 > /dev/null 2>&1 & # optional
发现这里居然也用到了xvfb
Reference
[Issue: I can’t make v2 driver work without headless option ]